WordPress included REST API as an inbuilt feature of it since version 4.7 and from then it is one of the most exciting and revolutionary features of WP. With REST API we can extend WordPress to whatever want. REST gives us the power to use WordPress as a backend of any application and in frontend we can use whatever technology we prefer.
In this tutorial, I’ll show you how you can add a blog post from the front end of your website with the help of REST API. You don’t have to visit your WordPress admin every time you come up with a new idea for a new article.
REST API Endpoints
WordPress provides endpoints for every content of the website. We can get those data in the form of JSON responses by visiting those endpoints. We can get posts, pages, media, users, custom post types everything through endpoints. You can check WordPress reference to get more knowledge on it.
In this tutorial, I am going to use posts endpoint http://yourwebsite.com/wp-json/wp/v2/posts. We can see our posts data in JSON format by visiting this link (obviously replace yourwebsite.com with your domain name).
To fetch posts data we have to send GET request to the URL. Also, we can create an article by sending a POST request to this URL. I am going to use this for this tutorial.
Create Form To Add Post

At first, we need to create a page with a form where we can submit the new post. After submitting the post from frontend we will use JavaScript code to send the values of these fields to WP REST API. Here I have used twentyseventeen child theme which I have created in my previous WP child theme tutorial.
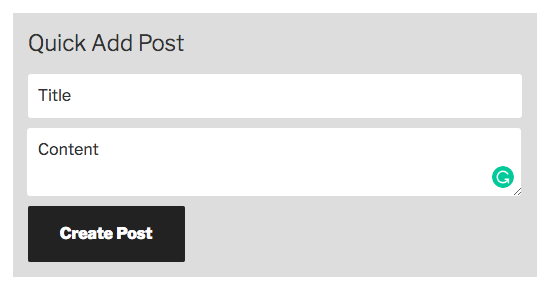
So, first I have created a page template with this form and it includes form HTML & CSS for styling.
<div class="admin-quick-add">
  <h3>Quick Add Post</h3>
  <input type="text" name="title" placeholder="Title">
  <textarea name="content" placeholder="Content"></textarea>
  <button id="quick-add-button">Create Post</button>
</div>
This is a simple HTML with 3 form fields to get the basic contents for a post.
.admin-quick-add {
	background-color: #DDD;
	padding: 15px;
	margin-bottom: 15px;
}

.admin-quick-add input,
.admin-quick-add textarea {
	width: 100%;
	border: none;
	padding: 10px;
	margin: 0 0 10px 0;
	box-sizing: border-box;
}
This is some simple CSS codes to make the form look little better. This is not mandatory for this tutorial, but it doesn’t hurt to look better.
Now the main part where we are going to handle our requests with REST API. To do this first we need to create a JS file, where we will put all the necessary codes. For this, I have created api-custom.js file within a directory called js/ within my theme directory.
Now first enqueue that js file with our website. To do that go to functions.php file and add a line of code to enqueue the file.
wp_enqueue_script( 'api-custom-js', get_stylesheet_directory_uri() . '/js/api-custom.js', NULL, 1.0, true );
As I’m using a child theme I used get_stylesheet_directory_uri() here, if you are doing it your original theme, then you can use get_template_directory_uri() instead.
Now, the main code within api-custom.js file.
// Quick Add Post AJAX
var quickAddBtn = document.querySelector('#quick-add-button');

if( quickAddBtn ) {
    quickAddBtn.addEventListener("click", function(){
        //alert('clicked');
        var ourPostData = {
            "title" : document.querySelector('.admin-quick-add [name="title"]').value,
            "content" : document.querySelector('.admin-quick-add [name="content"]').value,
            "status": "publish"
        }

        var createPost = new XMLHttpRequest();

        createPost.open("POST", additionalData.siteURL + "/wp-json/wp/v2/posts");
        createPost.setRequestHeader('X-WP-Nonce', additionalData.nonce);
        createPost.setRequestHeader("Content-Type", "application/json;charset=UTF-8");
        createPost.send(JSON.stringify(ourPostData));
        createPost.onreadystatechange = function() {
            if(createPost.readyState == 4) {
                if( createPost.status == 201 ) {
                    document.querySelector('.admin-quick-add [name="title"]').value = '';
                    document.querySelector('.admin-quick-add [name="content"]').value = '';
                } else {
                    alert('Error - Try again.');
                }
            }
        }
    });
}
Here, we created a variable quickAddBtn by selecting the button element. On click event we are posting the form fields value. From line 7 – 11 we created our data posting variable with both the title & content for the post with an additional status field with publish value.
With createPost variable we generated header request to send POST request to the API. At line 15 we have sent POST request to our website API endpoint URL. Over there I have used additionalData.siteURL before the URL. This providing the website base URL and completing the full URL. To get this data we have to go back to our functions.php file and add the codes right below after the api-custom.js file enqueue code.
wp_localize_script( 'api-custom-js', 'additionalaData', array(
  'nonce' => wp_create_nonce( 'wp_rest' ),
  'siteURL' => site_url(),
) );
Now, we can access these data in our JS file, also notice here I have added another nonce field in this, which is used at line 16 to validate our request in WordPress way. Then on next line, we have specified which kind of data we are posting to the server.
Later we are checking the responses from the server and providing some user experience based upon the responses.
So this is it. By implementing these codes to your website you just created a WP REST API application.
I hope this tutorial helped you understand WordPress REST API more.
Complete WordPress REST API tutorial series link.
- WordPress REST API Tutorial: Create Posts Using WP REST API [This Post]
- WordPress REST API Tutorial: Fetch Blog Posts by WP REST API
Here is the video representation of this tutorial in Hindi.
Happy coding 🙂

how insert custom form with acf field from frontend using wp rest api
Hello sir, Please fix this issue “additionalaData” this is not correct therefore show error in console, I have checked in this code you added extra “a” = > “additionalaData”.
Solved :
============================
wp_localize_script( ‘api-custom-js’, ‘additionalData’, array(
‘nonce’ => wp_create_nonce( ‘wp_rest’ ),
‘siteURL’ => site_url(),
) );
I’m getting additional data is not defined error