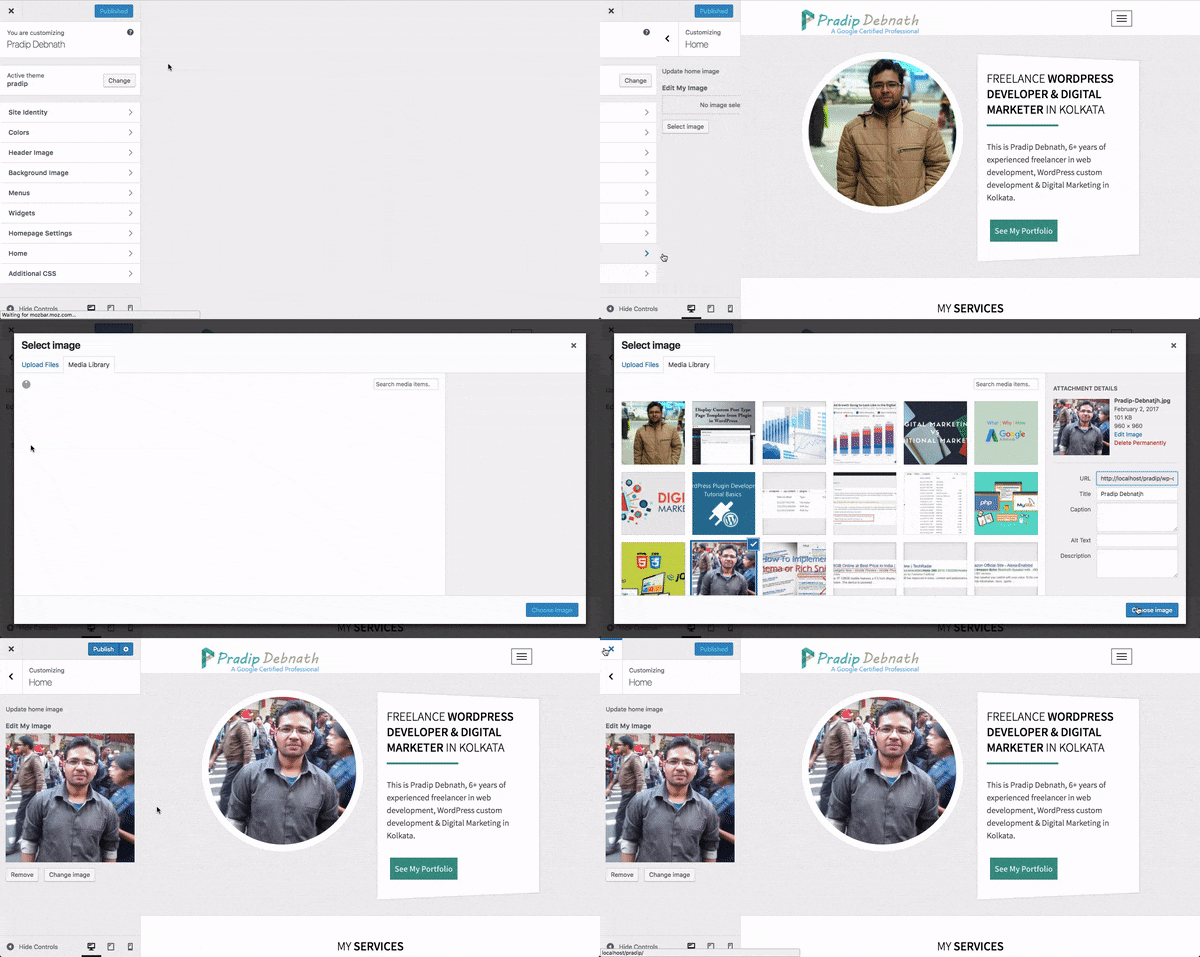
As of now you already know that, It is widely accepted that WordPress is the most popular CMS in the world. To become the most famous in the market, WordPress provides it developers tons of ways to customise it. WP customizer is one of the cool feature of WordPress, where we as a developer can create JS enabled rich settings to update contents easily. In this tutorial I will show you how you can upload image using WP customizer.
If you want to be a theme developer, then this is one of the top feature to learn. For WordPress theme development basics read my previous tutorial.
Let’s get started.
What is WP Customizer?
It is a section within admin panel of WordPress, we can go there by appearance -> Customize , which let web admins to customise some of the part of their themes. And we as a theme developer can add our own custom sections there to make our theme more accessible.
Here I am going to create a new menu within my theme customizer called “home” and within it I will provide an option to upload an image and that image will update to the theme from customizer.
For customizer codes I have created a file called customizer.php within “/inc/“ directory in my theme folder and include that file to my function.php file.
Here is the code to include in functions.php
/**
 * Customizer additions.
 */
require get_template_directory() . '/inc/customizer.php';
Now after adding the file to functions.php we can go ahead and do the coding for WP customizer in customizer.php file.
add_action( 'customize_register', 'my_customize_register_func' );
Here we have added customize_register action to hook into WordPress customizer and in second parameter we mention the name of our function where we will write our code. If you wish to know more about WordPress hooks, then follow my previous tutorial.
Within our custom function my_customize_register_func , now we need to add a section.
// Add Customize Section
$wp_customize->add_section('pdn_home_section', array(
    'title' => 'Home',
    'description'   => 'Update home image'
));
Here in add_section first we need to give this section a name in first parameter. In second parameter we are passing an array which provides user understandable name as title and provide a description of the section.
Then we need to add a setting for this section.
$wp_customize->add_setting('pdn_home_img_settings', array(
    //default value
));
In this add setting code we have provided name of this setting as previously mentioned on add section area. Then we can provide some default value for the field, but in our case for image it won’t work so we leave it as blank. However we can provide our default image to our theme, which I’ll show you later on this tutorial.
$wp_customize->add_control( new WP_Customize_Image_Control( $wp_customize, 'pdn_home_img_control', array(
    'label' => 'Edit My Image',
    'settings'  => 'pdn_home_img_settings',
    'section'   => 'pdn_home_section'
) ));
Here we have added a control and uses WP_Customize_Image_Control class to get image uploader to our field. Then within array we have given our settings & section name which we have created before.
So here our function is completed and here is the full view of our customizer.php file.
add_action( 'customize_register', 'my_customize_register_func' );

function my_customize_register_func( $wp_customize ) {

    // Add Customize Section
    $wp_customize->add_section('pdn_home_section', array(
        'title' => 'Home',
        'description'   => 'Update home image'
    ));

    $wp_customize->add_setting('pdn_home_img_settings', array(
        //default value
    ));

    $wp_customize->add_control( new WP_Customize_Image_Control( $wp_customize, 'pdn_home_img_control', array(
        'label' => 'Edit My Image',
        'settings'  => 'pdn_home_img_settings',
        'section'   => 'pdn_home_section'
    ) ));
}
Now by this we can get our field within customizer and we can add an image to out filed but it won’t appear or change anything on our theme. To show the changes we have to call it to our theme file where we want it to appear.
To get the value of this customizer field to our theme, we can echo get_theme_mod(‘pdn_home_img_settings’) where the parameter is the name of our setting.

By this time we can get customizer fields like I mentioned above. I hope it helps you to create your first WP customizer field.
Now I am going to show you as I promised before that I will show you how you can add default value to image field, when there is no image at the beginning in our customizer field.
Here it is.
$my_img = get_template_directory_uri() . '/images/Pradip_Debnath.jpg';
if (get_theme_mod('pdn_home_img_settings') !='') {
    $my_img = get_theme_mod('pdn_home_img_settings');
}
We can add path to our default image to a variable then check if we have any value from customizer. If we can find the value from customizer then we can assign that value to our variable.
And as our variable now is ready with default and customizer value we can echo it anywhere as per our requirement.
If you need more visual help on this then I have also created a video tutorial for this. Check this out.
